Phones
How to Have SIM Number in Bluestacks?

As we steadily navigate the technologically advanced landscape of the 21st century, Android emulators like Bluestacks have revolutionized the way we use mobile applications. By bridging the gap between the mobile platform and PCs, Bluestacks has given users the flexibility to use mobile apps on a larger, more robust system. However, a common inquiry from many Bluestacks users revolves around incorporating SIM number functionality into the platform. This article will guide you through the process, detailing the importance and usability of having a SIM number in Bluestacks, and how to seamlessly implement this functionality.
The Concept of a SIM Number in a Virtual Environment
At the core of any cellular device lies the SIM (Subscriber Identity Module) card, which carries an identification number unique to the owner, known as the SIM number. This number enables network providers to identify and authenticate the user’s mobile device on their network, providing the necessary services.
Now, when considering Bluestacks, we’re venturing into a virtual environment. Bluestacks, fundamentally, is a software platform that emulates an Android system on your computer. This brings us to a crucial question – how can a SIM number exist in a virtual environment like Bluestacks?
Despite being a virtual environment, Bluestacks has the potential to mimic many functionalities of a physical Android device. While it doesn’t natively support SIM card functionality, it can be circumvented using apps that leverage VoIP (Voice over Internet Protocol) technology to provide a virtual phone number that acts similarly to a SIM number.
These apps (e.g., Google Voice, TextNow, Talkatone) provide a phone number which you can use to call, text, and receive voicemail like any regular SIM number. This process is achievable because these apps use the internet for the transmission of voice data, hence bypassing the need for physical SIM card functionality.
However, it’s vital to note that while a virtual phone number can emulate a SIM number’s basic functions, there are certain limitations. For example, some services that require phone number verification (like specific banking or subscription services) may not accept virtual phone numbers. Therefore, while the following process will provide a functional “SIM-like” experience in Bluestacks, it may not completely replace the need for a physical SIM in certain scenarios.
Preparatory Steps
Before embarking on the journey of adding a SIM number to your Bluestacks, certain preparatory steps must be taken to ensure a smooth and successful process. These steps involve having the necessary resources and setting up your Bluestacks environment for the process. The resources required for this process are:
- A Computer System: Bluestacks operates on both Windows and macOS, so you need a computer system with either of these operating systems. Ensure that your system meets the minimum system requirements for running Bluestacks to avoid any operational issues.
- Bluestacks Application: If you haven’t installed Bluestacks yet, you can download it from the official website. The latest version is recommended for the best compatibility with other applications.
- Internet Connection: A stable internet connection is necessary for the download and installation of apps within Bluestacks, as well as the VoIP functionality.
- A VoIP Application: As previously mentioned, you’ll need a VoIP application to provide you with a virtual phone number. There are numerous apps available like Google Voice, TextNow, Talkatone, etc. This guide will use Google Voice as a reference, but the process remains similar for most VoIP apps.
Once you’ve assembled the necessary resources, you need to set up your Bluestacks application. If you have recently installed Bluestacks, you should complete the initial setup, which involves signing in to a Google account, similar to a new Android device setup. This is crucial because the Google account will be necessary for downloading apps from the Google Play Store within Bluestacks.
How to Add a SIM Number in Bluestacks
Once your Bluestacks environment is set up and ready, it’s time to venture into the process of adding a SIM number to your Bluestacks. Remember, this process is not adding a physical SIM but a virtual phone number that emulates the functionality of a SIM number.
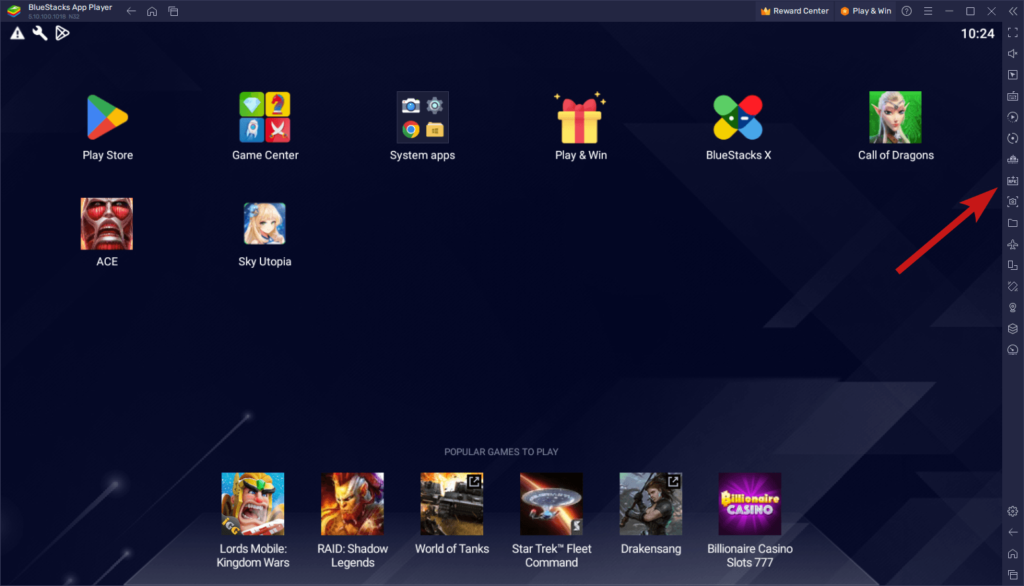
- Launch Bluestacks: Open the Bluestacks application on your computer. You’ll be greeted with the home screen, showing your installed apps and access to the Google Play Store.
- Download a VoIP app: Click on Google Play Store, and in the search bar, type “Google Voice” (or any other VoIP app of your preference). Download and install the application.
- Set up Google Voice: Open Google Voice and sign in using your Google account. Follow the prompts to choose a phone number. This will be your virtual phone number that acts as a SIM number.
- Verify your new number: Google Voice will ask to verify your new number by sending a code to an existing phone number. Once you enter this code in Google Voice, the setup will be completed.
Now, you have a functioning virtual phone number in your Bluestacks environment, which you can use for calling, texting, and voicemail. However, keep in mind the limitations mentioned earlier about certain services not accepting virtual numbers.

Potential Issues and Troubleshooting
Despite the simplicity of the process, you may encounter a few potential issues while trying to add a SIM number to your Bluestacks. Let’s address some of these and provide troubleshooting tips.
Issue 1: The most common problem users face is Bluestacks running slow or crashing. This is often due to your system not meeting the recommended specifications for Bluestacks.
Solution: Ensure your system meets the recommended requirements or try closing other resource-intensive applications while running Bluestacks.
Issue 2: Some users might have issues downloading or setting up the VoIP app.
Solution: Check your internet connection and ensure it’s stable. If you’re having trouble with a specific app, try a different one.
Issue 3: Google Voice or other VoIP apps might not be available in your region.
Solution: Unfortunately, these apps are region-dependent. However, you can try using a VPN to bypass these restrictions.
Issue 4: The virtual number provided might not be accepted for verification by some services.
Solution: As previously mentioned, certain services may not accept virtual phone numbers for verification. In such scenarios, using a physical SIM card might be necessary.
Remember, while Bluestacks and similar platforms aim to emulate the Android experience as much as possible, certain aspects are still bound by the limitations of the virtual environment.

Useful Applications of Having a SIM Number in Bluestacks
Understanding the value of having a SIM number in Bluestacks might not be instantly apparent, but upon deeper exploration, several practical applications surface.
1. Multi-tasking: With a virtual SIM number on Bluestacks, you can simultaneously operate your phone and PC, making multitasking easier. You can attend calls or text while working on your PC, ensuring a seamless workflow.
2. Testing Apps: Developers can use the virtual SIM number for testing applications. This setup provides a simulated environment for apps that require phone number verification.
3. Gaming: For gamers, having a SIM number in Bluestacks can enhance the multiplayer gaming experience, enabling easier in-game communication.
4. Business Purposes: A virtual SIM number can also be useful for business owners. You can use the number for customer service or marketing, keeping your personal and professional communications separate.
5. Privacy: It offers an extra layer of privacy, as you can provide a virtual number instead of your actual phone number, ensuring your personal number’s safety.
Conclusion
Incorporating a SIM number into Bluestacks offers multifaceted advantages, enhancing productivity, privacy, and versatility of usage. Although there are certain limitations and potential issues, the advantages, in many cases, outweigh the difficulties.
By understanding the requirements, following the setup guide, and being prepared for potential troubleshooting, users can transform their Bluestacks experience. This guide seeks to facilitate this transformation, bringing the benefits of mobile telecommunications into the broader PC platform.
FAQs
1. Can I use Bluestacks without a SIM number? Yes, you can use Bluestacks without a SIM number. The SIM number is not a requirement but an additional feature that you can add if needed.
2. Can I use my actual SIM number in Bluestacks? No, Bluestacks does not natively support physical SIM card functionality. However, you can use a virtual number that emulates a SIM number’s functionalities.
3. Is it safe to use a virtual SIM number? Yes, using a virtual SIM number is generally safe. However, always ensure that the VoIP app you choose is reliable and secure. Also, be aware of the data you share and with whom.
4. Can I use different VoIP apps other than Google Voice? Yes, there are numerous VoIP apps available like TextNow, Talkatone, etc. You can choose based on your preferences and requirements.
5. Can I add more than one SIM number in Bluestacks? Yes, you can add more than one virtual SIM number in Bluestacks. Each VoIP app you install can provide a unique number.
-

 Gadgets6 months ago
Can Dogs Use VR Headsets?
-

 Tech6 months ago
What Does “Voicemail Pending” Mean?
-

 Phones5 months ago
How Do I Know if My Phone Supports AR?
-

 Tech5 months ago
Does Astigmatism Affect Your VR Experience?
-

 Business5 months ago
How Do You Make an AR Without Coding?
-
 Phones5 months ago
What To Do About That Weird Notification Sound on Android?
-
 Tech4 months ago
How Can I Get Google Drive 1TB for Free?
-
 Phones4 months ago
How Does SnapDrop Work? – Instant File Sharing Made Easy

