Phones
How Do I Make My Android Phone Silent Except for One Number?

Imagine working on an important project, and your phone starts to ring. You get up to receive the call and find out a random mobile company called you to advertise their new offer.
All that phone call did was upset your rhythm. So, you think of putting your mobile on silent but don’t want to miss anything important at the same time.
Now you might wonder how I make my Android phone silent except for one number? Just go into the settings of your mobile and turn on the option of Do Not Disturb (DND). Then select “Allow Calls From,” add your favorite numbers, and click on Do Not Disturb.
Next, we will discuss the different methods of turning on DND Mode on an Android Phone.
How to Set the Limits of Silent Mode
In short, you can’t allow only some of the calls to ring after putting your mobile on silent mode. However, if you use Do Not Disturb Mode, you can receive calls from the selected group of favorites. In comparison, all other notifications and calls remain silent.
By using DND mode, you can have a lot of flexibility to focus on your essential task. You can make a list of contacts and add them to your favorites, thus putting them in that sort of VIP category.
How Do I Silence All but One Number on Android?

This task is doable, and to set your phone this way, follow the order of these steps:
- Open your phone’s contact list.
- Select that particular number, or if you want to allow calls from more than one number, select them all one by one. Next, add them to your favorites.
- Open the settings menu.
- Click on notifications or sounds.
- Select and enable Do Not Disturb mode.
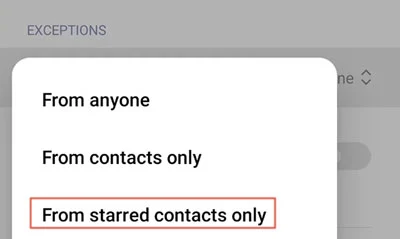
- Then, click on Exceptions or Allow Calls Only.
- Add your favorite contacts here, and you are done.
If done correctly, this method will set up your phone so that all other calls go through silent mode. At the same time, this saves your battery from draining too fast when you’re waiting on a call.
How to Silence an Android Phone: Three Easy Methods
You can utilize some practical options from your smart device to achieve the results discussed above. Here are the three most convenient routes:
Method 1: Turning On “Do Not Disturb” From the Mobile Screen
The first method consists mostly of swiping the top of your screen. You will see an option named “Do Not Disturb”. Tap on it to apply. This will mute all the visual disturbances, notifications, and sounds.
The advantage of turning on DND is that it allows specific calls to ring. However, aside from those, all other distractions won’t pop into view as usual.
Method 2: Toggle “Do Not Disturb Mode” From Phone Settings
In some Android phones, you don’t have the option of turning on the Do Not Disturb Mode. Instead, you’ll have to navigate to the settings menu and select that particular option.
So, open your phone’s settings and scroll down. You will find the option of vibrations and sounds. Click on it, and next, you will see the “Do Not Disturb” mode. Turn it on if you want to rest your eyes and ears for a while. Afterward, don’t forget to revert this choice to resume using your phone as before.
Method 3: Turning On “Silent Mode” on Android
Our final and last method is turning on the silent mode to block the distracting notifications. To get this job done, go into the settings of your mobile. Then, select Sound & Vibrations, and there you will see the option of “Silent Mode”. Check the box to allow it.
You will find this option on some models at the top of the screen. In that case, simply swipe, find “Silent Mode,” and select it. Note that you won’t get the calls even from your favorite numbers when you activate Silent Mode.
How to Manually Add Emergency Contacts on Android Phone?

Emergency contacts are those numbers that will still ring when your mobile is on Silent Mode. But, you have to add all of them manually. Here is the method of adding emergency contacts to your Android phone:
- Open the “Phone” app on your mobile.
- Navigate the menus and find the “Contacts” section.
- Click on the contacts that you want to ring, even in the silent mode.
- In the top right corner, you’ll see a star symbol. Tap on it to finish the procedure.
Now all of your emergency contacts are added to your list of favorites. The best part? If your mobile is silent and anyone calls from emergency contacts, it will still ring. So, this frees up space for your other activities while allowing you to keep track of any important development.
Can You Receive Notifications on Silent Mode?
Yes, you will still get some notifications even if your mobile is on silent mode. These include reminders, messages, calls, and other similar activities. However, your phone will not ring on those occasions, and it won’t divert your attention.
If you want to allow your device to ring only when a certain contact is trying to reach you, you can use any of the methods mentioned above. Plus, all of the methods are pretty straightforward to set up and get used to.
Conclusion
Android phones have a lot of advantages and valuable features that lessen our workload. But sometimes, all those means of communication can overwhelm us and impair our productivity at the workplace.
Fortunately, you can tailor the frequency of the calls that upset your focus. In other words, you can pick some favorites and configure your phone to ring only for those numbers. To do so, start by grouping your favorites together. Then, add those to the tab of Exceptions/ Allow Calls Only. After doing so, the next time you turn the DND mode on, only those chosen few will have the means to disturb you.
-

 Tech6 months ago
Android Auto Disconnects When Phone is Locked? – Easy Fix
-

 Gadgets5 months ago
Can Dogs Use VR Headsets?
-

 Tech5 months ago
What Does “Voicemail Pending” Mean?
-

 Phones5 months ago
How Do I Know if My Phone Supports AR?
-

 Tech5 months ago
Does Astigmatism Affect Your VR Experience?
-

 Business5 months ago
How Do You Make an AR Without Coding?
-

 Phones4 months ago
What To Do About That Weird Notification Sound on Android?
-

 Tech4 months ago
How Can I Get Google Drive 1TB for Free?


